

Direct Answer: Yes, you can convert an MBR disk to GPT without deleting your files by using Microsoft’s built-in MBR2GPT tool or a trusted partition manager. However, no method guarantees complete safety. Back up your important files before you start, check your disk for errors, and follow the correct steps. After converting a Windows system disk, you may also need to change your firmware settings from Legacy BIOS to UEFI.
Introduction
Converting an MBR disk to GPT can help you prepare your PC for Windows 11, use larger drives, and support UEFI boot mode. However, many users worry about losing important files during conversion. The good news is that you can convert an MBR disk to GPT without deleting your data by using Microsoft’s MBR2GPT tool or a trusted partition manager. In this guide, you’ll learn the differences between MBR and GPT, how to choose the right method, and which safety steps to follow before converting your disk.
MBR vs GPT: Quick Comparison
MBR and GPT are two partition styles that tell Windows how a disk stores and organizes partitions. Both can work well, but GPT supports newer systems and larger drives.
| Feature | MBR | GPT |
| Maximum disk size | About 2 TB with standard 512-byte sectors | Supports drives larger than 2 TB |
| Partition limit | Up to 4 primary partitions | Usually up to 128 partitions in Windows |
| Firmware support | Commonly used with Legacy BIOS | Required for standard UEFI boot setups |
| Windows 11 | Not suitable for standard UEFI system boot | Supports standard UEFI system boot |
| Data protection | Stores partition information in one main location | Keeps backup partition information and uses integrity checks |
| Best use | Older computers and legacy setups | Modern computers and larger drives |
GPT offers more flexibility for modern Windows computers. MBR can still work for older systems, but its limits may create problems when you upgrade your hardware or operating system.
Which partition style should you choose?
Choose GPT if your computer supports UEFI and you want to use a modern Windows setup. Keep MBR if you need compatibility with an older computer or operating system. Before changing your disk, confirm that your computer supports the boot mode required by your intended setup.
Do You Actually Need to Convert?
Not every computer needs a partition-style change. First, check your current setup and identify the reason for the conversion. Windows 11 supports standard UEFI boot configurations that use GPT for the system disk. If your computer currently boots Windows from an MBR disk using Legacy BIOS, you may need to change both the disk partition style and the firmware boot mode. The requirement that windows 11 requires gpt convert mbr describes a common upgrade situation, but the exact steps depend on your current system.
You may need to convert your disk if:
- You want to install Windows 11 using UEFI boot mode.
- Your system disk uses MBR, but your computer supports UEFI.
- You want to use a drive larger than 2 TB with its full capacity.
- You want to create more than four primary partitions on a basic disk.
If your computer already uses GPT and UEFI, you usually don’t need to make any changes.
For a clean Windows installation, you can also delete existing partitions and let Windows create new ones. However, that approach can erase your files. If you want to keep your current installation, choose a conversion method that supports your situation.
Method 1: Use Microsoft’s Built-In MBR2GPT Tool
Microsoft provides MBR2GPT, a Windows utility that converts a supported system disk from MBR to GPT without normally deleting its existing partitions or files. This method works well when your Windows installation meets the tool’s requirements. Before running it, back up your data and confirm that you can access your computer’s firmware settings.
Requirements and command steps
First, check these points:
- You have administrator access to Windows.
- You want to convert a supported Windows system disk.
- Your disk meets MBR2GPT’s partition layout and other validation requirements.
- Your computer supports UEFI boot mode.
- You have a current backup of important files.
Follow these steps.
Step 1: Open Command Prompt as an administrator.
Search for Command Prompt in the Windows Start menu. Right-click it and select Run as administrator.
Step 2: Identify the disk number.
Open Disk Management by searching for Create and format hard disk partitions. Locate your Windows system disk and check its disk number.
Step 3: Validate the disk.
Run the following command, replacing 0 with your actual system disk number:
mbr2gpt /validate /disk:0 /allowFullOS
The validation process checks whether the disk meets the tool’s conversion requirements. If validation fails, don’t continue until you understand and resolve the reported problem.
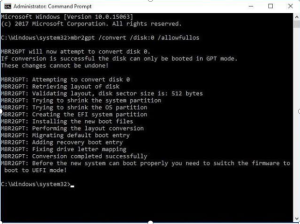
Step 4: Convert the disk.
After successful validation, run:
mbr2gpt /convert /disk:0 /allowFullOS
The tool attempts to convert the selected disk. Command results and requirements can vary with the Windows version and disk layout, so check Microsoft’s documentation if you receive an error.
Step 5: Change the firmware boot mode.
After a successful conversion, restart your computer and enter its firmware settings. Change the boot mode from Legacy BIOS or CSM to UEFI, if your system requires that change. Save your settings and restart Windows.
Important: Changing the boot mode before completing the conversion can stop Windows from starting. Follow the correct order for your computer.
What if MBR2GPT refuses to run?
The tool may reject a disk because its partition layout doesn’t meet the requirements, its configuration contains unsupported partitions, or validation detects another problem. Don’t delete partitions or format the disk just to force the conversion. Review the error message first. For more guidance, read this article on how to convert MBR to GPT without data loss. It can help you understand alternative steps and precautions before making changes.
Method 2: Convert with a Partition Manager
If you prefer a graphical interface instead of command-line instructions, a partition manager may offer a simpler way to handle the conversion. A tool such as 4DDiG Partition Manager provides disk and partition management features, including MBR-to-GPT conversion. Check the current product documentation to confirm that its available features support your disk type and conversion needs. A graphical tool can make the process easier to follow, but you should still back up your files before making changes to your disk.
How to convert MBR to GPT using a graphical tool
Step 1: Download and install 4DDiG Partition Manager on your computer. Connect the target disk to your PC, launch the application, and select Clone OS Disk.
Step 2: Choose the target disk where you want to clone your system data. The source disk contains your existing Windows installation, while the target disk is the drive that will receive the cloned data. Click Next to continue.
Step 3: Review the disk preview before starting the cloning process. The software allocates the target disk space to the cloned partitions by default. If needed, drag the handles to adjust the partition sizes. Once the layout looks correct, click Start.
Step 4: Review the warning about overwriting data on the target disk. Make sure you’ve selected the correct drive and backed up any important files stored on it. Click Sure to confirm and proceed.
Step 5: Allow 4DDiG Partition Manager to complete the cloning process. The time required depends on the amount of data and the speed of your drives. Avoid using other disk-management tools or interrupting the operation while cloning is in progress.
Which method should you choose?
Use MBR2GPT if you want a built-in Windows solution and your system disk meets Microsoft’s requirements. Choose a partition manager if you prefer a graphical interface or need features that the built-in utility doesn’t provide. I would choose the built-in tool first for a supported Windows system disk, then consider a partition manager if the command-line method doesn’t fit the situation.
Frequently Asked Questions
1. Is converting MBR to GPT completely safe?
No conversion method is completely risk-free. A power failure, disk error, unsupported partition layout, or incorrect firmware setting can cause problems. Back up important files before you begin.
2. Will I lose my files during conversion?
Supported conversion methods can preserve existing partitions and files. However, unexpected errors can still cause data loss. A separate backup gives you a way to recover your files if something goes wrong.
3. Can I convert my Windows system disk?
Yes, you can convert a supported Windows system disk with MBR2GPT or a compatible partition manager. You must also ensure that your computer supports UEFI and that its boot settings match the converted disk.
4. Do I need to reinstall Windows after conversion?
Not usually when you successfully convert a supported system disk using a method designed to preserve the existing Windows installation. However, you may need to adjust your firmware settings before Windows can start.
5. Should I convert every MBR disk to GPT?
No. Convert only when you need GPT’s features or your system configuration requires it. If your current disk works well and you have no reason to change its partition style, you can leave it as it is.
Conclusion
You can convert mbr to gpt without data loss by using Microsoft’s MBR2GPT utility or a compatible partition manager. MBR2GPT is a good first choice for supported Windows system disks, while a graphical tool may suit users who prefer a visual process. Before you start, back up your files, validate your disk, and confirm that your computer supports UEFI. After conversion, check the firmware settings and make sure Windows starts correctly. If you prefer a graphical interface, explore 4DDiG Partition Manager and review its current features before proceeding. Choose the method that fits your disk configuration, and never risk your important files just to complete the conversion quickly.