
In the realm of automated testing, Playwright shines as a powerful tool for replicating real user interactions within web browsers. Yet, the true magic lies in the meticulous inspection of elements. Just as a painter needs a steady hand for intricate details, automated tests demand precise element identification and interaction.
Imagine Playwright as your digital assistant, meticulously mimicking user actions like clicks, inputs, and selections. But without accurate element inspection, it’s like giving directions without a map. Elements – those buttons, forms, and dropdowns – must be precisely identified for your automated tests to navigate flawlessly.
Whether you’re an automation expert or a curious newcomer, this guide is your compass. We’ll delve into Playwright’s inspection tools, tap into the prowess of browser developer tools, decipher selectors for pinpoint accuracy, explore hands-on interaction with elements, and conquer challenges posed by dynamic content.
Our goal? Empower you to craft automated tests with surgical precision. By the end, you’ll wield the ability to craft robust tests that safeguard the quality and functionality of your web applications. Let’s begin our journey into the heart of Playwright’s element inspection capabilities.
Understanding Playwright’s Element Inspection
Automated testing has revolutionized software development by ensuring consistent and reliable application behavior. Playwright, an innovative open-source Node.js library, has emerged as a powerful tool for automating browser interactions. To truly harness its potential, one must understand how Playwright interacts with elements on a webpage, the significance of accurate element identification, and the role of selectors in this process.
Playwright’s Interaction with Webpage Elements:
Playwright facilitates automated interactions with web elements by simulating user behaviors. It launches browser instances, navigates to URLs, fills forms, clicks buttons, and performs a myriad of other actions. It essentially replicates human interactions in a controlled and programmable manner, allowing for the creation of comprehensive test suites that exercise every aspect of a web application.
Importance of Accurate Element Identification:
Imagine a navigation system guiding a car – if it mistakes a street, the journey goes awry. Similarly, in automated testing, element identification is the compass. Accurate identification ensures that Playwright’s virtual “clicks” land on the right buttons, inputs, and links. Failing to accurately identify elements could lead to false positives, missed defects, and unreliable tests.
Introducing Selectors: CSS, XPath, and More:
Selectors are Playwright’s tools for precisely identifying elements on a webpage. These include CSS selectors, XPath expressions, and even simple text matches. CSS selectors, resembling patterns used for styling, are commonly employed due to their simplicity and efficiency. On the other hand, XPath expressions offer more advanced querying capabilities for complex element hierarchies. The ability to select elements using their text content further enriches the arsenal of selectors.
Setting Up Your Testing Environment:
Before diving into element inspection, a solid testing environment is crucial. Setting up a Playwright project involves a few fundamental steps:
- Installation: Start by installing Playwright as a Node.js dependency in your project.
- Browser Context: Choose the right browser context for your testing needs. Playwright supports Chromium, Firefox, and WebKit. Different browsers can mimic various user scenarios, so selecting the appropriate one is essential for accurate testing.
Using Playwright’s Built-in Inspection Tools:
Playwright comes equipped with powerful tools to inspect elements and their properties, aiding in the accurate identification of elements for testing purposes.
Built-in Inspection Features:
- Page Inspector: This feature allows you to hover over elements on a webpage, highlighting them and providing basic information about the element’s HTML structure.
- Element Explorer: With the exposeBinding method, you can expose functions in the browser context that return element handles. This allows you to interactively explore elements in the browser’s console.
Launching Developer Tools:
Developer Tools are indispensable for in-depth element inspection. You can access them by right-clicking on a webpage and selecting “Inspect” or by using keyboard shortcuts. The Developer Tools offer a plethora of features to inspect, modify, and debug elements.
Playwright’s inspect Method:
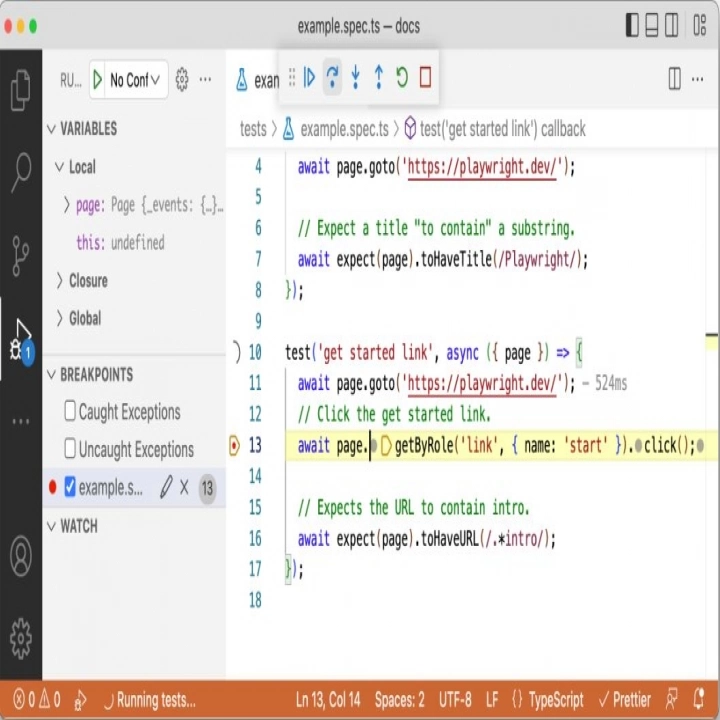
Playwright’s inspect method is a handy tool for quick element inspection. By calling page.inspect(selector), Playwright pauses the execution of your script and allows you to interactively inspect the selected element in the browser context. This is especially useful for debugging and exploring the structure of the DOM.
Leveraging Browser Developer Tools:
While Playwright’s built-in inspection tools are powerful, browser Developer Tools offer even more in-depth capabilities for element inspection and manipulation.
Effective Access to Developer Tools:
Accessing Developer Tools can be done through the browser’s menu or by right-clicking on an element and selecting “Inspect.” Alternatively, you can use keyboard shortcuts like F12 or Ctrl+Shift+I.
Exploring the Elements Panel:
The Elements panel in Developer Tools provides a comprehensive view of the Document Object Model (DOM). Here, you can inspect the HTML structure, styles, and attributes of elements. You can also modify the DOM in real time to test how changes affect your application.
Advanced Interaction Techniques:
Developer Tools enable advanced interaction techniques that go beyond Playwright’s built-in tools.
- Hovering: By selecting the “hover” tool in the Elements panel, you can simulate mouse hover over elements to trigger CSS pseudo-classes or JavaScript event listeners.
- Selecting and Modifying: Developer Tools let you directly select elements in the DOM, modify their attributes, and even add new elements for testing purposes.
Identifying Elements with Selectors:
Selecting elements accurately is fundamental to successful automated testing. Playwright offers various selectors, with CSS selectors being the most common.
CSS Selectors:
CSS selectors are concise and powerful. They enable you to target elements based on their attributes, hierarchy, and even dynamic states. For example, to select a button with a specific class, you can use .button-class.
XPath as an Alternative:
XPath, a querying language for XML documents, offers more granular element selection capabilities. While more complex than CSS selectors, XPath expressions can navigate intricate element hierarchies and conditions.
Examples of Common Scenarios:
- Selecting by ID: Use #element-id to target elements with a specific ID.
- Selecting by Class: Use .class-name to select elements by their class.
- Selecting by Attribute: Use [attribute=value] to target elements with a specific attribute value.
- Selecting by Text Content: Use :contains(text) to select elements containing specific text.
In conclusion, understanding Playwright’s interaction with elements, accurate element identification, and the application of selectors are essential for effective automated testing. A well-configured testing environment and mastery of Playwright’s built-in inspection tools and browser Developer Tools significantly enhance the precision and efficiency of your tests. By leveraging selectors like CSS and XPath, you can confidently identify elements and create robust tests that ensure the quality and functionality of your web applications.
Interacting with Elements Programmatically
Automated testing isn’t just about observing; it’s about taking control and performing actions as a user would. In Playwright, a plethora of methods empowers testers to interact with elements on a webpage. Let’s dive into the world of Playwright’s element interaction methods, covering actions like clicking, typing, selecting options, and more.
Various Methods for Element Interaction:
Clicking Elements: The click() method simulates a user click on an element. This is fundamental for testing navigation, buttons, links, and more.
await page.click(‘#button-id’);
- Typing into Input Fields: The type() method lets you input text into input fields or text areas. It mimics user keyboard input.
await page.type(‘#input-id’, ‘Hello, World!’); - Selecting Dropdown Options: To interact with dropdowns, Playwright provides the selectOption() method to choose an option by its value, label, or index.
await page.selectOption(‘#dropdown-id’, { value: ‘option-value’ }); - Checking and Unchecking Checkboxes/Radio Buttons: With the check() and uncheck() methods, you can simulate user interaction with checkboxes and radio buttons.
await page.check(‘#checkbox-id’); - Interacting with Mouse: The hover() method simulates hovering over an element, which can trigger hover states and tooltips.
await page.hover(‘#element-id’); - Submitting Forms: The submit() method emulates form submission, useful for testing form validation and data submission.
await page.submit(‘#form-id’);
Handling Dynamic and Complex Elements
Web applications often incorporate dynamic content that loads asynchronously. Such elements can pose challenges for automated testing, as they might not be available immediately. Playwright offers mechanisms to tackle these hurdles.
Challenges of Dynamic Elements:
Dynamic content might load with a delay due to animations, network requests, or JavaScript execution. Attempting to interact with such elements before they’re fully loaded could lead to test failures and false negatives.
Playwright’s Waiting Mechanisms:
Playwright’s waiting mechanisms help synchronize tests with dynamic content. The waitForSelector() method waits for an element to become visible and ready for interaction.
await page.waitForSelector(‘#dynamic-element-id’);
Strategies for Asynchronous Elements:
- Using Explicit Waits: Explicitly wait for a specific element using waitForSelector() before interacting with it.
- Waiting for Network Requests: Utilize waitForRequest() and waitForResponse() to synchronize tests with pending network requests.
- Waiting for Text Content: Employ waitForText() to wait until a specific text appears within an element.
Debugging and Troubleshooting
Even with the best practices, debugging is an inevitable part of automated testing. Let’s address common issues, provide debugging tips, and highlight error handling techniques to bolster the stability of your testing scripts.
Common Issues in Element Inspection:
- Flakiness: Tests that sometimes pass and sometimes fail due to timing issues or asynchronous content.
- Incorrect Selectors: Using selectors that aren’t unique, leading to interacting with unintended elements.
- Stale Elements: Interacting with elements that have changed or been removed from the DOM.
Debugging and Diagnosing:
- Console Logging: Insert log statements at key points in your script to track its progress and debug issues.
- Using Breakpoints: Pause script execution at specific points to inspect the browser’s state and variables.
- Taking Screenshots: Capture screenshots during test execution to visually identify issues.
Error Handling Techniques:
- Try-Catch Blocks: Wrap potentially problematic code in try-catch blocks to handle exceptions gracefully.
- Retries: Implement retry mechanisms to rerun failed tests after a short delay.
- Logging Errors: Log errors with context information to aid in diagnosing issues.
Best Practices for Element Inspection
Successful element inspection is a craft that requires precision and attention to detail. Here are some best practices to ensure your tests are robust, reliable, and maintainable:
- Consistent Naming Conventions: Use descriptive IDs, classes, and attributes for elements to enhance code readability.
- Modular Selectors: Define element selectors in a centralized manner to facilitate easy updates.
- Minimize XPath Usage: While XPath can be powerful, prefer CSS selectors for their simplicity and performance.
- Avoid Hard Waits: Minimize the use of fixed waiting times in favor of dynamic waiting mechanisms.
Integrating LambdaTest with Playwright Testing
As the complexity of web applications continues to grow, cross-browser and cross-device compatibility testing has become more important than ever. Ensuring that your application works seamlessly across various browsers and devices is a critical aspect of delivering a high-quality user experience. This is where LambdaTest comes into play, providing a cloud-based platform for testing web applications on 50+ test environments and real devices. In this section, we’ll explore how to integrate LambdaTest with Playwright testing to achieve comprehensive test coverage.
The Power of LambdaTest:
LambdaTest is a popular cloud-based testing platform that allows developers and testers to perform automated and manual testing of web applications on a vast selection of real devices and browsers. With LambdaTest, you can replicate real user interactions on different operating systems, browser versions, and screen sizes, ensuring that your application functions as intended for every user.
Advantages of LambdaTest Integration:
Integrating LambdaTest with Playwright testing brings several advantages to the table:
- Browser and Device Coverage: LambdaTest offers a vast library of browsers, browser versions, and real devices cloud, enabling you to test your application on a wide range of configurations.
- Cross-Browser Compatibility: Easily identify and resolve issues specific to different browsers, ensuring a consistent user experience across platforms.
- Responsive Design Testing: Test your application’s responsiveness by simulating various device orientations and screen sizes.
- Debugging and Troubleshooting: Use LambdaTest’s debugging tools to diagnose issues by inspecting elements and debugging code remotely.
Integrating LambdaTest with Playwright:
Integrating LambdaTest with Playwright is a straightforward process that expands your testing capabilities beyond what a single local browser can offer. Here’s how you can get started:
- Sign Up for LambdaTest: Create an account on the LambdaTest platform if you haven’t already.
- Obtain Access Credentials: LambdaTest provides access credentials (username and access key) that you’ll need to use the platform’s API.
- Install LambdaTest Node.js Library: Install the LambdaTest Node.js library using npm to enable integration with your Playwright scripts.
- Configure Playwright with LambdaTest: Set up Playwright to use LambdaTest as the remote testing environment by configuring the desired browser, browser version, and platform.
Executing Tests on LambdaTest:
With your Playwright tests configured to use LambdaTest, you can now run your tests on various browsers and devices offered by the platform. This allows you to validate your application’s behavior and appearance across different environments.
Reporting and Debugging:
LambdaTest provides detailed test reports, including screenshots and videos, allowing you to easily identify issues and share results with your team. If a test fails, you can review the captured screenshots and videos to understand the problem and make necessary adjustments to your application.
Conclusion
In the realm of automated testing, Playwright’s element inspection capabilities are like a magic wand that empowers testers to simulate user interactions precisely. From clicking buttons to handling dynamic content, Playwright provides an array of methods and techniques for effective testing. By mastering element interaction, debugging, and implementing best practices, testers can create tests that ensure the quality, functionality, and stability of web applications. Armed with this knowledge, it’s time to put Playwright’s element inspection to work and elevate your automated testing processes to new heights.