
Element location is a fundamental aspect of successful Selenium automation. It directly influences the reliability and effectiveness of your test scripts. Accurately locating elements ensures that your tests interact with the right parts of a web page, enabling consistent and error-free automation. In this blog, our aim is to guide you through various methods for element location using Selenium, empowering you to create robust and dependable automation scripts.
Understanding Element Location Strategies
In the world of Selenium automation, one of the most crucial aspects is the ability to locate elements on a web page accurately. Without the ability to identify and interact with specific elements, automation scripts become unreliable and prone to errors. In this section, we’ll dive into various element location strategies and explore the pros and cons of each.
- ID: The ID attribute provides a unique identifier for an HTML element. It’s a commonly used and efficient way to locate elements since IDs are meant to be unique within a page. However, not all elements have IDs, making this strategy limited in certain scenarios.
- Name: The name attribute can be used to locate elements. While it’s not as unique as an ID, it can be effective for locating groups of related elements, like form fields with the same name. However, it’s not suitable for all use cases.
- Class Name: Class names are used to apply styling to multiple elements. Locating elements by class name can be useful when a group of similar elements needs to be targeted. However, class names can be non-unique and subject to changes during updates.
- Tag Name: This strategy involves locating elements based on their HTML tag. While it’s a broad method to identify elements, it’s not very precise and is better suited for situations where multiple similar elements are involved.
- Link Text and Partial Link Text: These strategies are specific to locating hyperlinks on a web page. Link text targets exact matches of the link’s visible text, while partial link text matches a portion of the text. These are effective for navigation purposes but are limited to links only.
- XPath: XPath (XML Path Language) is a powerful strategy that allows for complex and precise element location. It can traverse the entire HTML structure, making it suitable for intricate scenarios. However, XPath expressions can become lengthy and may affect performance.
- CSS Selector: CSS selectors offer another flexible way to locate elements based on their attributes, class names, or relationships within the document. They are more concise than XPath and generally perform better. However, they might not be as powerful for certain complex scenarios that XPath can handle.
Each strategy has its strengths and weaknesses, and the choice of which one to use depends on the specific scenario and the element you’re trying to locate.
Using Built-in Selenium Methods
Selenium provides a set of built-in methods for locating elements using the different strategies mentioned above. Let’s take a look at how to use some of these methods with code examples.
from selenium import web driver
# Initialize the WebDriver
driver = webdriver.Chrome()
# Using find_element_by_id()
element_id = driver.find_element_by_id(“element_id”)
# Using find_element_by_name()
element_name = driver.find_element_by_name(“element_name”)
# Using find_element_by_class_name()
element_class = driver.find_element_by_class_name(“element_class”)
# Using find_element_by_tag_name()
element_tag = driver.find_element_by_tag_name(“element_tag”)
# Using find_element_by_link_text()
element_link = driver.find_element_by_link_text(“Link Text”)
# Using find_element_by_partial_link_text()
element_partial_link = driver.find_element_by_partial_link_text(“Partial Link Text”)
# Close the WebDriver
driver. Quit ()
These methods allow you to quickly locate elements using their respective strategies. However, they might not cover all scenarios, especially when dealing with dynamic or complex elements.
XPath: The Swiss Army Knife of Element Location
XPath is a querying language for selecting elements from an XML document, and it plays a vital role in Selenium automation. It provides a way to navigate through the elements and attributes of an HTML document, making it extremely powerful for locating elements in complex scenarios.
XPath Syntax and Structure: XPath expressions use a path-like syntax to traverse the HTML document’s structure. Here are some key components:
- /: Selects the root element.
- //: Selects all elements at any level.
- element: Selects an element by its tag name.
- [@attribute=’value’]: Selects elements based on attribute values.
- text()=’text’: Selects elements based on their text content.
Practical Examples of Using XPath: Let’s say we want to locate a “Login” button inside a div with the class “login-container.”
# Using XPath to locate the “Login” button
login_button_xpath = “//div[@class=’login-container’]//button[text()=’Login’]”
login_button = driver.find_element_by_xpath(login_button_xpath)
XPath’s ability to traverse the document’s hierarchy and its various selection options make it suitable for intricate scenarios like this.
Flexibility of XPath: XPath’s flexibility is evident in scenarios where element location strategies like ID, class name, or tag name are insufficient. For instance, when an element’s structure is deeply nested, XPath can easily navigate to it.
Mastering CSS Selectors
CSS selectors provide an alternative method for locating elements on a web page. While XPath is powerful, CSS selectors offer a more concise syntax and are generally faster. Let’s delve into CSS selectors and understand how they can be used effectively.
CSS Selector Structure: CSS selectors use a combination of HTML elements, attributes, and relationships to pinpoint elements on a page. Here are some common selectors:
- element: Selects elements based on their tag name.
- .class: Selects elements by their class name.
- #id: Selects an element by its ID.
- [attribute=’value’]: Selects elements based on attribute values.
Examples of Using CSS Selectors: Let’s find an input field with the class “username” inside a form with the ID “login-form.”
# Using CSS selector to locate the username input field
username_input_css = “#login-form .username”
username_input = driver.find_element_by_css_selector(username_input_css)
XPath vs. CSS Selectors: Both XPath and CSS selectors offer ways to locate elements, but they have distinct features that influence their use. XPath is more powerful for complex traversals and selections, while CSS selectors are more concise and efficient for simpler cases.
Strategies for Dynamic Elements
Dynamic elements, which change or load asynchronously, can pose challenges for element location. Selenium offers strategies to deal with these situations and ensure stable automation testing.
Using Relative XPath: When element IDs or classes are dynamically generated, it’s better to use a relative XPath that focuses on the element’s context. This makes the locator more resilient to changes.
# Using relative XPath to locate a dynamically generated element
relative_xpath = “//div[contains(@class, ‘dynamic’)]//button[text()=’Click Me’]”
dynamic_element = driver.find_element_by_xpath(relative_xpath)
Waiting Strategies: Dynamic elements might not be immediately present when the page loads. To handle this, Selenium provides waiting mechanisms like implicit and explicit waits.
- Implicit Wait: Sets a maximum time for the WebDriver to wait for an element to appear before throwing an exception.
driver.implicitly_wait(10) # Wait up to 10 seconds for elements to appear
- Explicit Wait: Allows for more fine-tuned waiting, waiting for a specific condition to be met before proceeding.
from selenium.webdriver.common.by import By
from selenium.webdriver.support.ui import WebDriverWait
from selenium.webdriver.support import expected_conditions as EC
wait
= WebDriverWait(driver, 10) # Wait up to 10 seconds
element = wait.until(EC.presence_of_element_located((By.ID, “dynamic_element_id”)))
These strategies ensure that your automation scripts gracefully handle dynamic elements and adapt to changes.
Combining Locators
In the world of Selenium automation, precision in element location is key to creating robust and reliable scripts. While individual locators like ID, class name, or XPath can help us identify elements, combining these locators can often provide a more precise and resilient way to locate elements on a web page.
Concept of Combining Locators: Combining locators involves crafting a locator strategy that utilizes multiple attributes or strategies to target a specific element. This is particularly useful when a single locator might not be sufficient due to dynamic changes in the application’s structure or to ensure a unique and accurate match.
Benefits of Combining Locators:
- Enhanced Precision: Combining locators reduces the risk of selecting unintended elements, ensuring that your automation script interacts with the desired element.
- Robustness: By using multiple identifiers, your script becomes more resistant to minor changes in the element’s attributes or structure.
- Adaptability: Combining locators allows scripts to gracefully handle dynamic web elements that might change attributes or positions.
Code Examples of Combining Locators: Consider a scenario where you want to click a “Submit” button within a specific form. You can combine locators like class name and XPath to pinpoint the element precisely.
# Combining locators to click the “Submit” button within a specific form
submit_button_locator = “//form[@class=’login-form’]//button[@class=’submit-button’]”
submit_button = driver.find_element_by_xpath(submit_button_locator)
submit_button.click()
In this example, the combination of class name and XPath ensures that the correct “Submit” button is clicked, even if other forms or buttons with similar attributes exist.
Best Practices for Robust Element Location
Ensuring stable and maintainable element location is essential for building sustainable automation scripts. Here are some best practices to follow:
- Prioritize Unique Identifiers: Whenever possible, prioritize locating elements using attributes like ID or unique class names. This minimizes the chances of inadvertently selecting the wrong element.
- Use Semantic Naming for Locators: Choose meaningful names for your locators that reflect the purpose of the element. This enhances code readability and makes maintenance easier.
- Regularly Review and Update Locators: As your application evolves, element attributes or positions may change. Regularly review and update your locators to adapt to these changes.
- Implement Error Handling: Element location can fail due to various reasons, such as element not being present or page loading delays. Implement try-catch mechanisms to handle such failures gracefully, adding reliability to your scripts.
Handling Common Challenges
Navigating the world of web automation can bring its own set of challenges. Let’s explore solutions for some common challenges related to element location:
- Elements Within iframes: When dealing with elements inside iframes, switch the WebDriver’s focus to the iframe before locating elements within it.
# Switch to iframe and locate element
driver.switch_to.frame(“iframe_name_or_id”)
element_in_iframe = driver.find_element_by_id(“element_id_inside_iframe”)
driver.switch_to.default_content() # Switch back to main content
- Elements With Dynamic IDs or Attributes: Use relative XPath or CSS selectors that focus on a parent element’s stable attributes before navigating to the dynamic element.
# Using relative XPath to handle dynamic IDs
relative_xpath = “//div[@class=’parent’]//button[contains(@id, ‘dynamic’)]”
# Using CSS selector to handle dynamic attributes
dynamic_element_css = “div.parent button[id*=’dynamic’]”
- Elements Loaded Through AJAX: Employ explicit waits to ensure the element is fully loaded before interacting with it.
from selenium.webdriver.support.ui import WebDriverWait
from selenium.webdriver.common.by import By
from selenium.webdriver.support import expected_conditions as EC
wait = WebDriverWait(driver, 10)
element = wait.until(EC.presence_of_element_located((By.ID, “element_id”)))
Tools for Element Inspection
During Selenium automation development, browser developer tools become invaluable aids in identifying suitable locators. Here’s how to make the most of them:
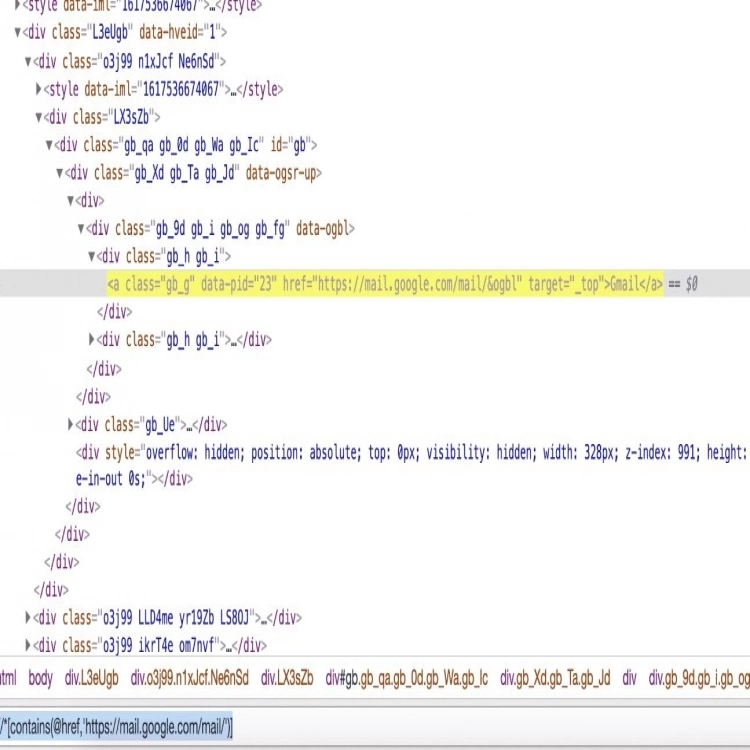
- Introducing Browser Developer Tools: Open the developer tools by right-clicking on the element you’re interested in and selecting “Inspect” (or a similar option).
- Using Inspect Element: When inspecting an element, the browser will highlight the corresponding HTML code, making it easier to identify the attributes that can be used as locators.
- Exploring Console: The browser console can help you test XPath or CSS selector queries directly to see if they target the desired element.
Additionally, consider leveraging LambdaTest’s cross-browser testing platform to validate element location across various real browsers and devices. This combined approach ensures robust automation scripts that function consistently in diverse environments.
Conclusion
Mastering element location is a cornerstone of successful Selenium automation. The ability to precisely locate elements enables reliable and resilient scripts that navigate the complexities of web applications. Combining locators, adhering to best practices, overcoming challenges, and effectively using browser developer tools are all essential skills for any automation engineer. By investing time in understanding and applying these techniques, you’ll empower yourself to create automation scripts that stand the test of time, promoting efficiency, stability, and accuracy in your web automation endeavors. Also consider using cloud based platforms like LambdaTest to enhance testing efficiency and broader compatibility assurance. Remember, the journey to becoming an adept automation engineer is marked by continuous learning, experimentation, and embracing the ever-evolving landscape of automation technologies.